A cluttered workbench isn’t just annoying, it’s a productivity killer. Hunting for a misplaced socket wrench or screwdriver wastes time and breaks focus. That’s where pegboard for tools comes in. Simple, affordable, and endlessly customizable, pegboard transforms chaotic tool piles into an organized, visible system where everything has a place and stays there. Whether upgrading a garage workshop or outfitting a new shed, pegboard offers versatile storage that grows with the project list. This guide covers everything from material selection to installation techniques, helping DIYers choose, mount, and configure pegboard systems that actually work.
Table of Contents
ToggleKey Takeaways
- A pegboard for tools transforms cluttered workspaces into organized, visible storage systems where every item has a designated spot, saving time and improving workshop productivity.
- Metal pegboard handles the heaviest loads (10–15 pounds per hook), hardboard offers budget-friendly options (5–8 pounds per hook), and plastic provides moisture resistance for mid-weight tools.
- Proper pegboard installation requires furring strips or spacers behind the panel to allow hooks to insert fully, mounted securely to wall studs with screws spaced every 12–16 inches.
- Organizing pegboard by task zones (plumbing, electrical, carpentry) rather than tool categories reduces search time and improves workflow efficiency during projects.
- Strategic hook placement—frequent tools at eye level, heavy items lower, specialty tools higher—combined with LED lighting maximizes accessibility and reduces strain.
- Building modular panels or rolling pegboard stations provides flexibility to reconfigure storage as tool collections grow without permanent wall modifications.
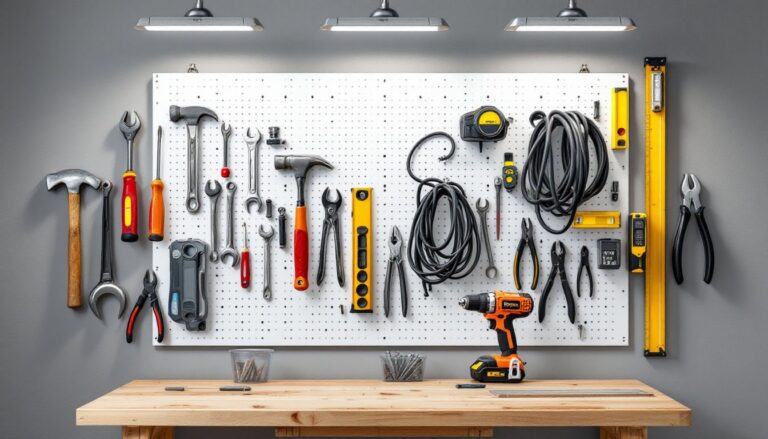
What Is a Pegboard and Why Every Workshop Needs One
Pegboard is a perforated hardboard panel with evenly spaced holes (typically ¼-inch diameter on 1-inch centers) designed to hold removable hooks, brackets, and shelves. Originally called Masonite pegboard after a common manufacturer, it’s evolved from utilitarian shop storage into a go-to solution for garages, craft rooms, and even kitchens.
The core advantage is flexibility. Unlike fixed shelving or cabinets, pegboard hooks reposition in seconds as tool collections change. A layout for automotive work rearranges easily when switching to woodworking or home repair. Tools hang in plain sight, reducing the “where did I put that” tax that eats into project time.
Pegboard also maximizes vertical space. Most workshops have limited floor area but plenty of empty wall real estate. Mounting a 4×8 sheet of pegboard reclaims square footage while keeping frequently used tools within arm’s reach. For renters or anyone avoiding permanent built-ins, pegboard installs with basic fasteners and leaves minimal wall damage when removed.
Another benefit: safety and maintenance. Hanging sharp tools, chisels, utility knives, pruning shears, keeps them off benches where they might cause injury or dull edges. It’s also easier to spot a missing tool mid-project when each item has a designated spot, reducing the chance of leaving a wrench inside an engine bay or behind a drywall panel.
Types of Pegboards: Choosing the Right Material for Your Tools
Pegboard comes in three primary materials, each with trade-offs in durability, cost, and load capacity.
Metal Pegboards
Steel pegboard is the workhorse choice for heavy tools. Powder-coated or galvanized panels resist rust and support substantial weight, quality metal pegboard handles 10–15 pounds per hook without sagging. Thickness ranges from 18-gauge (thicker, stronger) to 22-gauge (lighter duty).
Metal works well in humid climates or unheated garages where moisture would warp wood-based options. The material won’t bow under the weight of large wrenches, power drills, or even small air compressors. Downsides include higher cost (typically $40–$80 for a 2×4-foot panel) and the need for metal-cutting tools if custom sizing is required.
Aluminum pegboard offers a lightweight alternative with excellent corrosion resistance, ideal for coastal areas or outdoor sheds, though it’s pricier and less common at big-box stores.
Wood and Plastic Pegboards
Hardboard pegboard (often called tempered Masonite) is the budget-friendly standard, running about $12–$20 for a 2×4-foot sheet in ⅛-inch or ¼-inch thickness. The ¼-inch version provides better rigidity and load capacity, supporting 5–8 pounds per hook when properly installed with spacers behind it.
Hardboard works fine for hand tools, drill bits, measuring tapes, and lighter items. But, it absorbs moisture, which causes swelling and hole degradation. Painting or sealing the panel before installation extends lifespan in damp environments. Avoid using hardboard for heavy grinders, large levels, or dense tool sets unless the panel is backed by a French cleat or furring strip system for reinforcement.
Plastic pegboard (often polypropylene) splits the difference. It resists moisture, cleans easily, and costs slightly more than hardboard ($18–$30 for a 2×4-foot panel). Load capacity sits around 6–10 pounds per hook, making it suitable for medium-weight tools. Plastic can become brittle in extreme cold, so it’s less ideal for unheated northern workshops.
How to Install a Pegboard for Maximum Storage Efficiency
Proper installation determines whether pegboard becomes a reliable tool wall or a sagging disappointment. The critical requirement: creating a gap between the panel and wall so hooks can insert fully through the holes.
Materials needed:
- Pegboard panel (cut to desired size)
- Furring strips or spacers (1×2 lumber works well, providing ¾-inch actual thickness)
- Screws (2½-inch wood screws for studs: wall anchors if fastening between studs)
- Level
- Stud finder
- Drill/driver
- Safety glasses
Step-by-step installation:
-
Locate studs using a stud finder. Standard stud spacing is 16 inches on center, though older homes may use 24-inch spacing. Mark stud locations with painter’s tape.
-
Cut furring strips to run horizontally across the back of the pegboard. For a 4×8 sheet, three horizontal strips (top, middle, bottom) provide solid support. Rip 1×2s to ¾-inch width if extra clearance is needed for bulkier hooks.
-
Attach furring strips to the wall first. This method is easier than pre-mounting them to the pegboard. Drive screws through strips into studs, using a level to ensure they’re plumb. If studs don’t align with the desired pegboard location, use heavy-duty wall anchors rated for at least 50 pounds.
-
Mount the pegboard to the furring strips. Pre-drill holes through the pegboard into the strips to prevent cracking. Space screws every 12–16 inches along each strip. Countersink screws slightly so heads sit flush or just below the surface.
-
Verify hook clearance. Test a hook in several holes to confirm it inserts and seats properly. If hooks bottom out against the wall, add shim washers behind the furring strips.
Pro tip: For heavy tool loads, consider a French cleat system instead of simple furring strips. A cleat allows the entire pegboard panel to hang and unhook easily, making it simple to reconfigure or move the setup later. Use ¾-inch plywood ripped at a 45-degree bevel for the cleat.
Permit note: Pegboard installation typically doesn’t require permits, but if modifying load-bearing walls or installing in a commercial space, check local building codes.
Essential Pegboard Accessories and Hooks for Tool Organization
Standard pegboard uses ¼-inch peg hooks, but dozens of specialized accessories optimize storage for specific tool types.
Core hook types:
- Single and double J-hooks: The workhorses for hanging hammers, tape measures, and cordless drills. Double hooks provide extra stability for heavier items.
- Angled utility hooks: Extend 2–4 inches outward at a 45-degree angle, ideal for coiled extension cords or air hoses.
- Straight pegs: Simple dowel-style pegs hold spools of wire, rope, or rolled sandpaper.
- Shelf brackets: L-shaped brackets support small shelves (usually 6–12 inches deep) for storing paint cans, spray bottles, or parts bins.
- Tool holders: Purpose-built cradles for screwdrivers, pliers, wrenches, or chisels keep handles aligned and tips protected.
Specialty accessories worth considering:
- Pegboard bins and cups: Attach directly to holes for holding screws, nails, drill bits, or other small hardware. Clear plastic versions make contents visible.
- Magnetic trays: Mount to pegboard for catching loose fasteners during disassembly.
- Paper towel holders: Free up counter space by mounting a horizontal dowel or commercial holder.
- Tool silhouettes: Trace or print outlines of each tool and affix them to the pegboard behind hooks. This “shadow board” system makes it obvious when a tool is missing and where it belongs.
Material compatibility: Confirm hooks match the pegboard hole size. Standard ¼-inch pegboard uses ¼-inch diameter hooks, but some European or specialty panels use 5mm or ⅛-inch holes. Adapters exist, but buying matched systems avoids hassle.
Load distribution: Spread heavy tools across multiple hooks or use reinforced brackets. A single hook might hold 5–10 pounds safely, but concentrating several heavy items in one area can cause panel flex or fastener failure over time.
Creative Pegboard Layout Ideas to Maximize Your Space
Strategic layout turns pegboard from simple storage into an efficient workflow tool.
Zone by task: Group tools by project type rather than by tool category. Create a plumbing zone (pipe wrench, tubing cutter, Teflon tape), an electrical zone (wire strippers, voltage tester, fish tape), and a carpentry zone (squares, chisels, block plane). This reduces searching when switching between project types.
Height matters: Place frequently grabbed tools at eye level or just below. Heavier items like large hammers or pry bars go lower to reduce strain and keep the center of gravity down. Rarely used specialty tools can occupy higher or corner positions.
Leave expansion room: Don’t fill every hole initially. Tool collections grow, and leaving 20–30% of hooks empty allows the system to adapt without a complete reorganization.
Incorporate lighting: Mount LED strip lights or a clamp light above or beside the pegboard. Good lighting makes grabbing the right 10mm socket faster and reduces eye strain during detailed work.
Combine with other storage: Pegboard works well alongside tool chests for items that don’t hang well (loose sockets, small taps and dies). Use pegboard for visual, grab-and-go access: use drawers for organized small parts.
Mobile pegboard stations: Build a rolling pegboard cart using a 2×4-foot panel mounted to a plywood frame with casters. This creates a portable tool station that moves between the main bench, garage bay, or outdoor project areas.
Color coding: Paint the pegboard background in zones, gray for metalworking tools, green for yard equipment, blue for automotive. This visual system helps household members or shop assistants return tools to the correct areas.
Modular panels: Instead of one massive pegboard wall, install several smaller panels (2×2 or 2×4 feet). This approach allows rearranging entire sections as needs change and makes replacement easier if a panel gets damaged.
Pegboard isn’t just functional storage, it’s a flexible framework that evolves with skills and projects, keeping workshops organized for decades when installed and maintained properly.